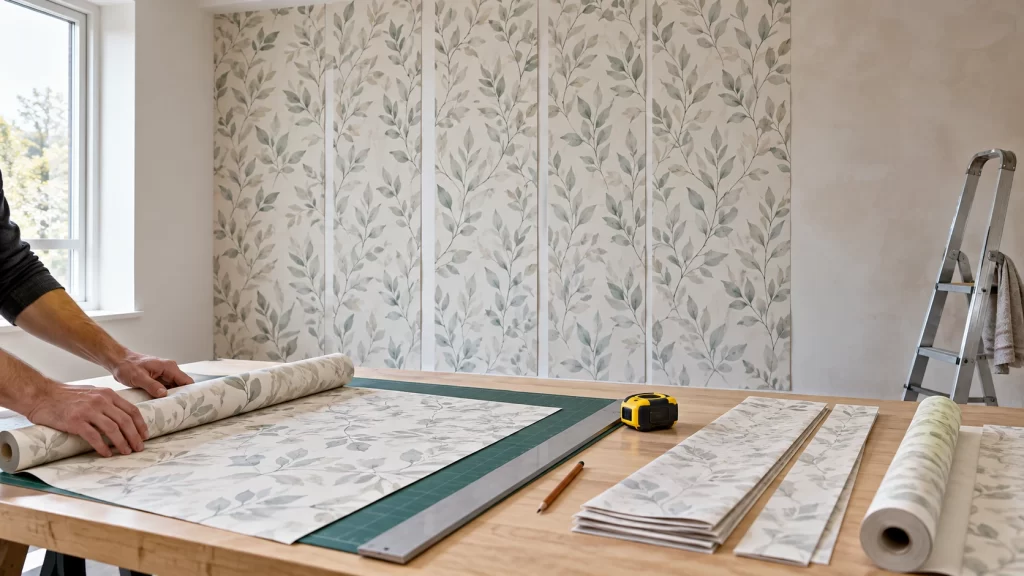
Wallpaper installation planning starts with two questions: how many full-length strips will the walls need, and where must the design line up? Measuring wall area alone will not answer either one. A roll may contain enough paper in total, yet still leave too little usable length for the final strip once trimming and pattern matching are allowed for.
Measure the walls as they will be papered
Measure the width and height of each wall, recording them separately. Check the height in more than one place, especially in an older room where floors and ceilings may not be level. Use the greatest height you find when planning strip lengths, then allow extra paper at the top and bottom for trimming.
Record doors and windows, but be cautious about subtracting their full area from the order. You may still need long strips beside an opening, and the pieces above and below it must fit the pattern. A simple sketch showing wall widths, openings, corners and the intended starting point makes the calculation easier to check.
If you are papering one feature wall, measure its entire width even if furniture will cover part of it.
Calculate full strips before rolls
Find the wallpaper’s roll width and length on its label. Divide each wall width by the roll width and round up to get the number of strips needed for that wall. Count the strips wall by wall: combining every wall into one total width can hide the extra strip needed at a corner. Allow for the way you intend to handle corners, since a strip may need to be cut and continued on the adjoining wall.
Next, divide the usable roll length by the planned cutting length for each strip, rounding down. This tells you how many full strips one roll can provide. Finally, divide the total strip count by the number of strips per roll and round up again.
For example, suppose a wall needs nine strips and your cutting plan yields three full strips from each roll. That points to three rolls for the wall. If aligning a pattern makes each strip longer and only two fit on a roll, the same wall needs at least five rolls. The key figure is usable full strips per roll, not the roll’s total coverage printed in square metres.
Read the pattern information before cutting
A plain or random-match wallpaper offers the most flexibility: adjacent strips do not need a particular motif to meet at the seam. A straight match places the same part of the design at the same height on neighbouring strips. A drop match shifts the design on alternate strips, so the next strip may need to start farther along the roll. The packaging should identify the match type and give the pattern repeat, usually as a distance.
The repeat is the distance before the design starts again in the same position. It is not necessarily the amount you will discard from every strip. Waste depends on the wall height, the chosen starting point and where the previous cut ended. For a bold geometric print or large floral design, lay out several planned strips before ordering or cutting.
Pattern placement matters as much as seam alignment. On a feature wall, a prominent motif may look better centred over a fireplace or within a visible wall section. Centring can change where the first strip begins and how much is trimmed at each end. Decide on that layout before using the simplest strip count as your final order.
Make a cutting plan that accounts for waste
Measure and mark each strip rather than cutting the whole room to one assumed height. Add trimming allowance, then move along the roll until the pattern position matches the strip beside it. Number cut strips in hanging order and mark their top edge on the back. This helps prevent an accidental reversal or a mismatch caused by picking up the wrong piece.
Keep usable offcuts for short areas above doors or below windows, but check their motif position first. Leave uncertain pieces uncut until the adjoining full strips are hung; the actual pattern position will then be clear.
Order enough material from the same production batch where possible. Colour can vary between batches, and an additional roll bought later may be visibly different beside the original paper. The amount of spare material worth keeping depends on the pattern, the room layout and the likelihood of future repairs; it should be considered when ordering, not after the last strip is hung.
For more detailed information on this topic, read our guide on How Exterior Painting Protects Commercial Buildings.
Prepare the wall and choose a sensible starting point
Even careful measuring cannot compensate for a wall with loose paint, uneven patches or old covering that is lifting. Inspect the surface, make necessary repairs and follow the wallpaper manufacturer’s instructions for preparing the wall and applying adhesive. Check that the surface is ready before cutting strips to length.
Establish a vertical guide for the first strip rather than trusting a corner to be straight. Work out where seams will land around windows, doors and the most visible part of the room. Avoid ending with a very narrow sliver in a prominent position if shifting the starting point can prevent it. At corners, plan the join according to the wall and the paper rather than forcing a full-width strip around an uneven angle.
Before the first cut, compare the wall sketch, strip count and pattern plan against the rolls in hand. Those few checks can reveal a shortage while the material is still uncut. Good wallpaper installation planning leaves room for real walls, trimming and pattern alignment, so the finished design looks continuous where it matters most.